Being able to strike cuttings from your bonsai trees is a fantastic feeling. You’ve created an entirely new tree by simply taking a branch off another one and sticking it in some soil – but how do you do it? In this article, I’ll detail how to grow a bonsai tree from a cutting and then keep it alive, ensuring it thrives under your care.
By cutting off shoots from our trees, we can propagate them by giving them the right conditions and leaving them for a few weeks, which hopefully encourages the shoot to form roots. Once the roots form, you have a new bonsai!
Growing a bonsai tree from a cutting can be done with most species; however, some can be harder to propagate than others. Species such as junipers are much easier to propagate from cuttings than maples. Maples are easier to propagate from seed instead. However, they may not stay true to the mother plant.
You should note, though, that if you propagate trees from cuttings – it can take quite a few years for them to grow and develop into an established bonsai tree. It can take around ten to fifteen years – it depends on how you treat the tree and the species! It has to be constantly watered, fertilised, pruned, wired and repotted.
The needs of cuttings can be quite different compared to fully grown trees, but let’s start with how you can propagate some cuttings below:
1) First, ensure your tools are clean and sharp. This is especially important if you’ve been working on any diseased trees. This prevents the infection from being spread to other trees. Your tools should also be sharp to ensure the cuts are clean, helping the mother tree heal easier. You can use basic tools, such as general scissors or horticultural pruners.

2) Next, you should get the pot and soil ready to plant your cutting. It should be a clean pot with a bit of size to it. I recommend using a substrate such as lava rock or grit to plant the cutting in, or perlite or akadama. I usually use a 70/30 mix of akadama and sphagnum moss, which works well for me.

3) It’s time to cut! Now, you need to take a cutting around two to six inches long. After this, strip the lower leaves off of the cutting, planting it in the soil about a few centimetres into the soil. The top leaves should have some clearance between them and the soil.

4) Firm the soil around the newly-planted cutting, ensuring it’s tight and stays in place when you water it. If needed, add some extra soil around it to make sure it’s compact.
5) I recommend placing something such as a plastic bag or a humidity dome over the pot to trap moisture, increasing humidity for the cutting and increasing its chances of striking. This helps to reduce water loss from the cutting. It can also help to keep the temperature up, which is vital in striking cuttings.
6) The pot should be partially shaded, not in direct sun. It would be best if you watered cuttings every few weeks when the soil starts to dry out, and I recommend misting them frequently.
7) Depending on the species, it may take around two or three months for the cutting to root. Give them a little tug; if they resist, they might have formed roots. You can remove the plastic bag or humidity dome if they have rooted and continue to water like usual.
8) The following spring, you can repot the rooted cuttings into their separate pots, giving them plenty of space to grow. Be careful when repotting, as the roots will be small and delicate.
From this point on, you’ve now got a new tree! It might take a few years to look like one, but it’ll get there!
You need to know how to take care of that young plant now. It’s different from looking after a more established tree, so read below to find out how to keep it alive.
If you need more guidance on how to take cuttings and plant them, check out this video:
Watering
Bonsai cuttings will require less water than older and more developed trees. Their root mass is relatively small, and they might not put on large amounts of growth in their starting years, depending on how you care for them.
This will depend on the species, though. Trees such as wisteria will require quite a lot of water compared to maple seedlings/cuttings. In summer, I recommend letting wisteria sit in water due to its high water demand. Otherwise, they can dry out quickly.
To water cuttings (or bonsai in general), I like to thoroughly water them for ten seconds, leave them for a minute and then water them again for ten seconds. This ensures the roots have received sufficient water, which is very important for cuttings as they can’t handle a lack of water and older trees.
If you need help determining when to water your cutting or tree, you should poke your finger an inch deep into the soil. If it’s still wet, you should refrain from watering until it’s dryer. I recommend keeping the soil moist moist of the time and only watering when the soil is slightly starting to dry out. Otherwise, this can lead to overwatering.
Underwatering
Underwatering can kill a cutting very quickly. A common sign of underwatering is the bonsai leaves turning brown or yellow. This is the plant shedding leaves to try and reduce transpiration (water loss from the leaves) and conserve water. This can kill cuttings exceptionally quickly compared to older trees, so I recommend keeping a close eye on your cuttings.
Overwatering
Overwatering can also kill a cutting, although it might take a bit longer. Overwatering a tree can rot its roots, which means that it won’t be able to function anymore, reducing the effectiveness of osmosis (water movement in the plant). Again, this will affect cuttings much more than older trees, so watch out for this.
To reduce the risk of overwatering, you should use free-draining soils such as akadama, pumice, lava rock, grit or kanuma. They all have different properties, but akadama is a very general and helpful soil for most bonsai. It can be expensive, but it comes in large quantities, which will last you for quite a while, depending on how many trees you own!
Soil Mixes
I like to propagate cuttings in a mix of akadama, sharp sand and sphagnum moss. Sphagnum moss is very useful for seedlings and cuttings, as it’s perfect for reviving sick plants, and roots are eager to grow in it. However, it can hold quite a lot of water. Sand is an excellent soil medium for cuttings and as a seed mix.
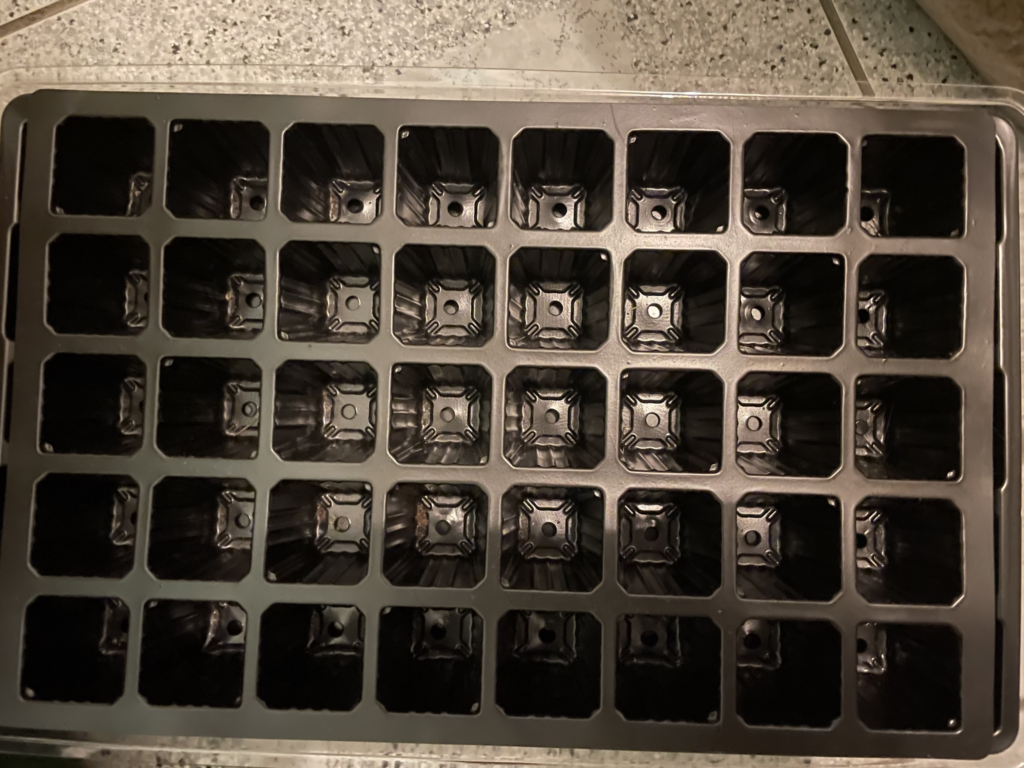
In the picture below, I’ve used a mix of sharp sand, perlite, akadama and a bit of sphagnum moss for the soil medium for these Chinese elms. They’ve rooted exceptionally quickly. However, they are Chinese elm, so I wouldn’t expect any less, to be honest. They’ve been kept in my propagating tray with a humidity dome over it for a few weeks, and to be honest, they haven’t had as much care as my other cuttings – and they’ve done completely fine!

Light
Light is a significant factor in keeping cuttings alive (or any tree or plant). Without light, plants won’t be able to photosynthesise and die very quickly. If they can’t photosynthesise, they can’t produce the energy needed for mechanisms such as osmosis or translocation – vital processes in keeping a plant alive.
I’ve found that cuttings can’t handle as much light as older trees can, so I like to keep them in partial shade and limit the amount of light they get, although I ensure they get a good amount. Again, it all depends on the species, though. Some can handle a lot of light, such as junipers. This helps to tighten their foliage, improving their appearance. However, they are cuttings, so make sure you aren’t putting too much stress on their roots.
More light will help drive growth in the plant, so I always ensure that my cuttings get a sufficient amount of light, even if they burn easier than others. For example, with my satsuki azaleas, I was keeping them on my windowsill in a plastic bag for humidity and temperature. In contrast, I kept my Chinese elms in a propagating tray outside with shade.

I’ve found that putting transparent plastic food bags or any other transparent material over cuttings significantly greatly improves the strike rate of the cutting. This keeps them in a humid and warm environment, which is essential for propagation, reducing water loss from the cutting and helping their chance of striking.
Temperature / Overwintering
Cuttings are a lot more sensitive to temperature than older trees. If you are propagating a cutting in a warm environment for a while and then suddenly move it out into cold temperatures – this will most likely cause it to lose a few leaves, which could end up killing it. This is the same for seedlings, and hardening off needs to be done for cuttings and seedlings.
Cutting leaves are much more tender and sensitive to the cold and light than older trees. When you believe it’s ready to move outside, you should ‘harden it off’.
Hardening plants off should be done gradually. This typically happens over a week or two for me. I move the cuttings out for a few hours into the partial shade, which helps them acclimatise and get used to the temperature and light. After a week has passed, I’m happy to leave them outside unless it’s forecast to be very warm or very cold.
If you have been keeping your cuttings under a grow light with no external light, they may not be used to the day/night cycle yet, so it might take a bit longer to harden them off.
A daunting thought is overwintering cuttings or seedlings. This scared me the most when I first began propagating plants, and it still does. However, I’ve gained a lot more experience. The thought of losing all of my cuttings to the weather, which could randomly change at any time, is sad!
I have recently bought a cold frame which I use to overwinter my cuttings. I’ve put it in a partially shaded area of my garden, and I make sure that the temperatures inside it don’t get too hot by ventilating it daily. This also helps to provide fresh air, which prevents diseases such as powdery mildew from striking. This is a mistake I made when I overwintered my trees once, and they got a bad case of powdery mildew that affected them in spring.
Recently, we’ve had a relatively bad cold snap in England. In our area, temperatures have reached -5C, with temperatures going much lower in other places. Luckily, I was prepared by checking the forecast! I first moved all of my cuttings into the garage and then into the cold frame when I had it built. This prevented them from being immediately killed by the cold, even though the soil had frozen a bit, unfortunately.
Before putting them into storage, though, I like to spray the cuttings with a very low concentration of an all-purpose fungicide. This ensures they won’t overwinter with any diseases, which could hit them in spring and cause damage. You must use low concentrations. Otherwise, this can kill the cutting.

Wiring
I recommend wiring your cuttings or seedlings as early as possible before they stiffen. However, it would be best if you waited to do it, as they might be fragile in the first few months. This could damage them and reduce their rate of survival. I usually wait a few months after they’ve struck to wire them to get an initial shape. It is essential that you wire them early, though. Otherwise, they’ll be a straight stick for the rest of their life!
However, you can leave some cuttings for around a year or two before they need to be wired, as you can still get a pretty good shape in them. I’ll have to try this myself. With cuttings, I recommend using aluminium wire. It’s a lot easier to work with and cheaper. Even with species such as junipers or pines, which typically use copper wire, I use aluminium wire when they’re still very young.

It would be best if you left the wire on for a short time, both on cuttings and at any stage in the life cycle of a tree. It can damage the bark, leaving it prone to disease and ugly wire scars that will stay with the tree for quite a while.
Before applying wire, I always make sure I know why I am using that wire. If I don’t, then I won’t apply the wire at all. You should have a brief idea of how the branches or trunk will be set out before you use the wire, and you shouldn’t just needlessly wire whenever you want, as this will waste both your wire and your time.
Technique
You should use wire at a 45-degree angle between coils when applying wire. This ensures you can bend it at a good angle and look much neater. You should never cross wire either, as this can cut the movement of water in the tree, which could cause a branch to die, or even the entire cutting.
If you already have wire scars, you should wire in the scars if you need to wire a branch. This prevents other scars from forming, but you shouldn’t have any on your cuttings!
To remove the wire, you should use wire cutters. Don’t uncoil the wire with your hand, as this will damage the bark and you risk snapping the section you are wiring, wasting all of the time and effort put into it.
Fertilising
Avoid burning the roots on your cuttings. I never fertilise my cuttings for around two years after they strike, as I’ve done this before, and it kills them very quickly. If you’re not going to heed my advice, then at least do it with a weak concentration, making sure to dilute it a lot.

I’ve found that with seedlings, though, they seem to handle fertiliser a lot better. If you are going to fertilise seedlings, make sure you still use a low concentration, as they will still have relatively small and fragile roots that you can burn as quickly.
I like to use a liquid seaweed spray on my cuttings and seedlings, which helps them absorb some nutrients and is very good at helping them survive and thrive. I use 5-10ml to a litre of water, which does all of my trees quite well, helping to prevent any mineral deficiencies and building up the thickness of the cutting.

The only disadvantage of this seaweed spray is that it doesn’t have a very nice smell to it. It’s very economical, though, and it’s lasted me quite a few months even though I used it every day with my trees.
Pests and Disease
Unfortunately, pests and diseases are often overlooked when starting cuttings or seedlings. If the seedling or cutting is in a humid, warm environment for quite a long time, this can promote fungi to grow, harming the tree. It would be best if you ventilated the environment you are keeping the seedlings or cuttings in every so often, ensuring that it gets fresh air, as this will prevent any fungi from forming, especially in the wet soil.
Preventing Disease
Ventilation is essential in preventing disease. Unfortunately, I learned this the hard way in the winter when I didn’t ventilate my garage, where I kept many trees. This caused powdery mildew to spread throughout my trees, which was a pain as I had no fungicide on hand, and I had to run to a garden centre to get some quickly. I also found that, unfortunately, organic fungicides such as milk and water did not work.
It wouldn’t have killed off the trees immediately, but it did somewhat affect them come spring time, as I noticed that their growth rate had slowed down a bit.
Most people will opt for a chemical fungicide – and I do too. I’ve heard of and tried organic fungicides such as milk and water. However, I’ve tried this before on my roses, and this didn’t seem to work, especially in curing black spot, which is a pretty common and destructive disease with roses.
The most common diseases of bonsai include black spots, powdery mildew, leaf spot, canker disease, rust and chlorosis.
Chlorosis
I wouldn’t class chlorosis as a disease – but it still affects a lot of young plants. It’s most easily identified by the yellowing of leaves, which is caused by the reduction of chlorophyll (the green pigment) in leaves. This can be due to various things, such as a high alkaline content in the soil or, most likely missing nutrients. I’ve found this most common on plants such as azaleas, which prefer a more acidic soil instead of alkaline.
The water in my area is quite hard, so I like to use rainwater to water my azaleas. If I don’t have access to rainwater, though, I mix a teaspoon of white vinegar into my watering can once every month, which helps break up the soil’s alkaline content. It would be best if you did this infrequently, though, as this could also damage the roots.
Preventing Pests
Pests can also be a problem for young plants, mainly cuttings or seedlings. If you have stressed the young plants out through underwatering, overwatering, repotting or lack of sunlight, this can attract pests to the plant very quickly. Some common pests include aphids, vine weevils and spider mites. Aphids are identifiable by the sticky and shiny excretion they produce called ‘honeydew’. They also like to bunch up on leaves.
Regarding pests, I’m not particularly eager to use chemical pesticides. I’ve found that mixing dish soap and water is good enough to eliminate most pests or neem oil. When using chemical pesticides, you should note that this can also kill helpful insects in the garden, such as pollinators (bees, butterflies etc.) which isn’t very good for your garden or the environment in general, as it can also run off into water sources, causing significant problems.

Neem oil is especially effective in getting rid of pests, and it can be found for a low price on most websites.
Repotting
Repotting is one of the most crucial stages in a bonsai’s life cycle and cuttings. I’m a lot more scared to repot older trees than cuttings or seedlings due to the time invested and value of the tree, but it’s still quite annoying to lose one, especially if I’ve only struck a few or it’s quite a challenging species to strike, such as maples.
You should only repot trees for several reasons, such as lack of water permeability in the soil or if the tree has become highly root bound; otherwise, you are putting unnecessary stress on the tree.
When a tree is root bound, it means that the roots have encircled the pot many times, and it’s not healthy for the tree. If they have done this mainly at the bottom of the pot, it’s time for a repot.
You should only be repotting trees and cuttings at the right time of year – typically spring for most trees. However, some conifers prefer to be repotted earlier in the year. Some species that can be done in spring include; maples, beech, hawthorn, azaleas and Chinese elm. There are many more; these are just a few named examples.
How to repot your cutting or tree
To repot your tree, you should loosen the tree out of the pot slightly. You can do this by pushing on the bottom of the pot if it’s potted in a plastic pot. If it’s not, you can work the edges of the pot with something like a chopstick to loosen the roots. Once loosened, you should be able to push it out, or it should come out fairly quickly if you tip it at an angle.
This might be different if you have started your cuttings in a tray. Work the soil as much as possible while being gentle, trying to expose all of the roots of the cutting. Do this for all the cuttings, and repot them into their separate pots. This is why I prefer using trays which have dividers between them.
If your tree isn’t coming out, you could try something like a knife or a sickle. These are more likely to damage the tree, so I prefer using them on older trees. However, this might be your only option if it’s incredibly rootbound. This shouldn’t be much of a problem on cuttings, though.
After this, I will typically loosen the roots by taking some soil off the edges and bottom of the root mass. Depending on the size of the tree, you should adjust how much you take off. For example, if it’s a 1-2-year-old cutting, you should only take a small amount off. However, if it’s an established tree maybe 5-6 years old, you can get away with taking quite a bit more off. Some people like to wash the roots by submerging the tree in water, removing any soil around the roots.
I don’t use this method, as I don’t trust England’s climate enough to trust that the roots will be able to cope with this level of maintenance. On my more significant trees, I like to make wedge cuts. This is useful for repotting, as you remove old soil and replace it with new soil each time you repot the tree, making sure there’s no very old soil which doesn’t quite have the same characteristics or good use as new soil.
Preparation
Ideally, it would be best to prepare somewhere to repot your tree. I like to use a plant bench. However, you can do it anywhere you’re prepared to clean. Repotting can get very messy, so bring gloves and a hose to get all that soil off.
I prepare my soil mixes before spring, ensuring it’s ready for all my trees to be repotted. I like to use mostly akadama with some pumice mixed in for most of my trees. Many of my younger plants are azaleas, so my acidic soil mix is 40/40/20 kanuma, sphagnum moss and akadama. The mix I use for most of my cuttings is 70/30 akadama and sphagnum moss.
After preparing somewhere to repot the tree, you should also prepare the new pot that the tree is going in. Remember – if it’s a cutting or seedling, it’ll do much better in an ordinary grow pot than a bonsai pot. Bonsai pots are meant for established and developed trees to show them off, while younger material should be trained first and not restricted in growth, so they should be planted in grow pots.
To prepare the pot, you should make sure that it’s clean. After this, you should add mesh to the drainage holes, tying them in place with some wire. This prevents any loose soil from falling out, but this can’t be helped on some bigger pots, and it may not be cost-effective to use this method. I wouldn’t recommend doing this on massive grow pots with tons of drainage holes, as this would probably be quite a waste of wire and mesh.
Repotting the Tree
Depending on the size of the tree, I will also use tie-in wires which will help to keep the root mass in place while it grows into the soil, preventing it from falling out of the pot if, for example, it got knocked over by the wind.
The wire holding the mesh in can be a relatively small gauge, but the tie-in wires should be a higher gauge to ensure that it secures the tree, especially if it’s a huge tree.

After this, you should put a mound of soil, such as akadama, in the middle of the pot and wiggle the tree onto the mound. This will ensure the soil gets into the root ball, ensuring no air pockets underneath the trunk. I then fill up the tree with more soil.
You must firm the soil into place with something like a chopstick, preventing any air pockets. You should be thorough and ensure that no more soil can be pushed down. Otherwise, this could be bad for the tree down the line, as it might not have as much soil to push roots in and could lead to an earlier repot.

After the tree is fully repotted, I like to make sure that it’s watered quite thoroughly. In regards to aftercare, I’ll place it in partial shade for a few weeks and ensure it’s not being overwatered or underwatered, which is crucial for a newly repotted tree or cutting to survive. It would help if you also watched out for any late spring frosts, which can damage both the roots and the buds. This can kill a lot of cuttings, so whenever it’s forecasted, I make sure to put them in storage for the night.
Frequently Asked Questions (FAQ)
How do I know if my cuttings have failed?
Some common signs that your cutting has failed are browning leaves, weak stems or the soil not drying out due to the roots not taking in any water. The sign I use the most, though, is tugging the cutting as if there’s no resistance, then the cutting should come very easily out of the soil. If there are no roots, then the cutting has unfortunately failed, and you’ll have to try again at the right time. Another sign is that the stem has started to blacken, which definitely means that it’s dead
How much water should I give my cuttings?
When you have first planted them, I would recommend giving them a good amount of water to make sure that they have enough to survive until the next watering. I don’t recommend watering the cuttings every day initially, as they won’t be taking up large amounts of water, and you could subject the cuttings to root rot if they form any. You should only begin regular watering after a few months, but make sure that you check the moisture in the soil by using something as your finger.
How much light should I give my cuttings?
You shouldn’t keep your cuttings in full sun, as this will put too much stress on the roots and can cause them to die. I keep my cuttings in partial shade, where they only get a bit of sunlight a few hours each day. Those in small pots are kept on the windowsill, where I can manage the amount of light getting to them and keep a constant eye on them. This also makes misting and watering them a lot easier! Although I would recommend keeping a drainage tray under them just in case, they leak any water. After a few months, when they have formed roots, you can then harden off your cuttings and expose them to more sunlight, which should help them put quite a bit of growth on.
When can I start fertilising my cuttings?
To be on the safe side, I usually only fertilise my cuttings after a year or two. This makes sure that their roots can handle this and that they don’t die instantly. To offset any deficiencies in NPK (Nitrogen, Phosphorus and Potassium), though, I occasionally add a bit of potting compost to their mixes which normally has nutrients mixed in with them. However, compost can hold quite a lot of water, so I make sure to monitor the watering if I do this.
What species can I take cuttings from?
You can take cuttings from essentially any species. However, some are a lot harder to propagate than others. Species such as maples are a lot harder to propagate than others such as junipers or azaleas. Personally, I’ve found that azaleas are quite a lot easier to propagate than other species. However, it could be due to the fact that I have the most experience with them compared to other species.
It all depends on what you prefer, though! With maples, I would say that the best way of propagating them is by using seed or air-layering, though. Growing from seed means that it won’t stay true to the mother plant, though, so if you have a specific cultivar you would like to propagate, you should only do this through cuttings or air-layering.
Where can I get cuttings from if I don’t have a specific tree?
If you don’t own a specific species which you’d like cuttings from, you can always contact a forum or even go to a local bonsai club! Local bonsai clubs are packed with information, and they’re normally run by people who have practised bonsai for quite a while. You might even be able to get some pretty cheap material there. A lot of people are willing to trade cuttings with each other, which can help you get your hands on the trees that you like. I do this quite often with satsuki azaleas, as there are hundreds of cultivars which I don’t yet have!
So, do you know how to grow a bonsai tree from a cutting now?
Hopefully, the answer is yes. However, if it’s not, then I would recommend having a read over the article again and summarising key notes! It can be quite a lot of information to take in. However, the result is definitely worth it in the end. After all, who doesn’t love free trees? The best part is you can constantly multiply how many you have each year; just make sure that you can keep up with them all!