Garlic may not be the most glamorous vegetable, but it sure packs a flavorful punch! From its pungent aroma to its savory taste, garlic adds an extra element of deliciousness to all kinds of recipes. But before you can enjoy the bold and spicy flavor of fresh garlic, you have to first understand the stages of planting and harvesting it.
Here is your complete guide to garlic’s growing stages so you can enjoy its fragrant and tasty properties all year.
An Overview – The 5 Garlic Growing Stages

Garlic is one of the easiest vegetables to grow, and it’s a must-have for any garden. With garlic, there are five garlic growing stages that you should be aware of: planting garlic bulbs, pre-emergence stage, vegetative growth stage, bulb formation stage, and harvesting garlic.
1. Planting garlic
Here’s what you need to do in stage 1. Plant spring garlic cloves that have been cured for about a week in late fall or early spring, when temperatures are still cool, but frost is not expected anymore. Garlic likes well-drained soil with lots of organic matter. Dig up soil about 6 inches deep and mix in organic material. Plant garlic cloves 4-6 inches apart, with the pointiest end facing up.
2. Pre-emergence
Garlic can take up to 8 weeks to sprout above ground after planting. In this stage, garlic needs plenty of water, about an inch per week. If you live in an area with little rainfall, you should water garlic regularly.
3. Vegetative growth
When garlic sprouts above ground, the vegetative growth phase begins. During this stage, garlic needs plenty of light and water to grow healthy leaves and stems. Garlic also benefits from fertilisation during this stage.
4. Bulb formation
As garlic plants grow and get bigger, garlic bulbs will start forming underground. Avoid walking on garlic beds to help keep garlic bulbs from being damaged.
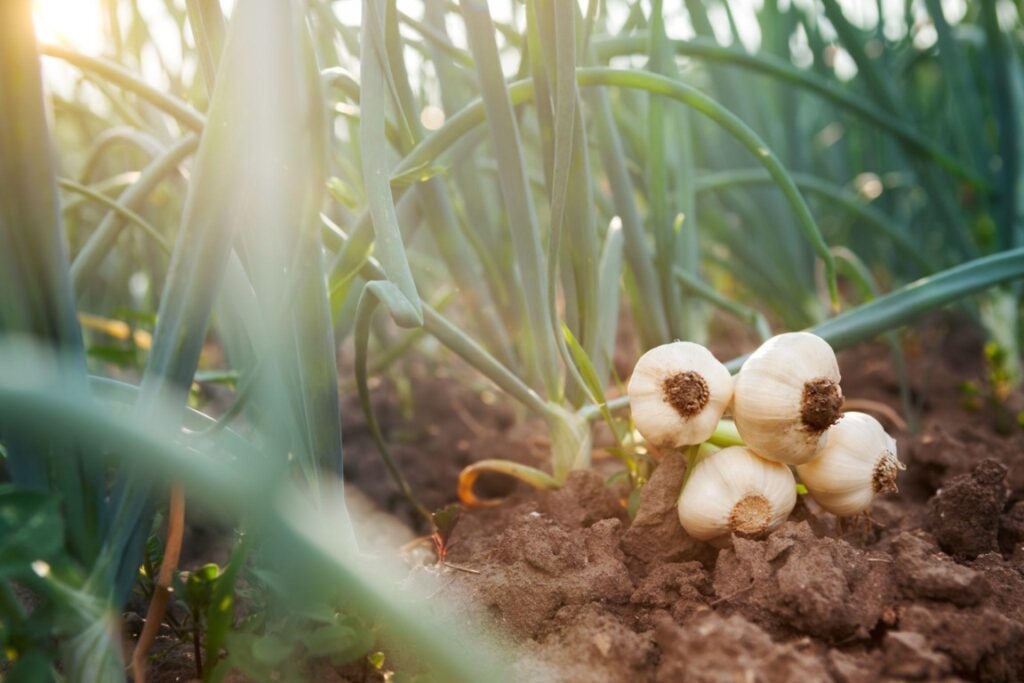
5. Harvesting garlic
Garlic is ready to harvest when the tops of the leaves have started to brown and curl inwards. Carefully dig around garlic plants with a garden fork or spade and remove garlic bulbs from the soil. Allow garlic to dry for about a week before storing it in a cool, dark place.
Now, let’s learn how to plant and grow garlic:
How to Plant and Grow Garlic

Garlic growing is an art – it allows you to take control of the garlic growing process from start to finish. And to perfect this art, we must understand the various stages of growing garlic to achieve the best possible results.
1. Choose the garlic variety
Select the suitable garlic variety for your growing region and soil type. Ensure you’re getting the freshest garlic bulbs available, as they produce healthier plants with greater yields. Some of the best varieties you can grow are ‘Inchelium Red’, ‘Spanish Roja’, and the Rocambole varieties.
2. Planting
Plant your garlic cloves 2-4 inches deep in late fall or early winter, for winter garlic varieties, when the soil is cold and wet. To properly plant garlic bulbs, make sure to place them root side down (flat side up) and 6-7 inches apart.
3. Watering
Once your garlic cloves are planted, the growing season begins. You’ll need to water your garlic plants twice a week (or more during hot weather) so they get enough moisture and don’t dry out. Tap water also can be used for the garden once chlorine is properly set down.
4. Mulching
Now, one of the most critical stages of garlic growing, applying a layer of mulch can help protect garlic plants from temperature extremes and keep weeds at bay. Use straw, hay, or shredded leaves to provide insulation. The rule of thumb is to spread the mulch to about 4-6 inches.
5. Feeding
Apply an organic fertiliser around your garlic plants every four weeks to promote healthy growth and maximise yields. One of the best fertilisers to use is an organic fish emulsion.
6. Spacing
Make sure to keep your garlic plants spaced out properly, with the recommended 6-7 inches of distance between them. This will ensure that each plant has enough growing space and air circulation.
7. Weeding
Weeding is one of the essential growing stages of garlic. Check your garlic beds regularly for weeds and remove them as soon as possible. Garlic bulbs don’t compete well against weeds, and keeping them under control will help ensure higher yields.
8. Staking
If growing tall garlic varieties like meadow garlic or elephant garlic, you’ll need to stake them for support. Use sturdy stakes at least 5 feet high, tie the plants to the stakes using twine, and remove the twine once they’ve started to flower.
However, don’t bother staking if you are growing short garlic varieties that stay close to the ground.
9. Protecting
Garlic plant growing stages involve protecting the plant as well.
Garlic plants can be affected by various diseases, so protect them during the growing season with an organic fungicide and insect repellent. This will help keep your plants healthy and prevent any crop loss.
10. Flowering
When growing garlic, you should expect the plants to start flowering sometime in late spring or early summer. The flowers are edible and can be used as garnishes or added to salads for a unique flavor.
11. Harvesting
As the growing season comes to an end, garlic bulbs start to mature and are ready for harvesting. Begin harvesting when the lower leaves on your garlic plants begin to turn brown and dry out.
12. Curing
Once harvested, hang the garlic stalks in a cool, dark place with good air circulation. This is known as “curing” the garlic and should take about 2-3 weeks.
13. Cleaning
When the curing process is complete, carefully clean off any dirt or debris from the bulbs with a soft brush. Don’t wash them, though, as this can cause moisture to accumulate on their skins and lead to rotting.
14. Storing
Once your garlic is cured, it’s time to store it. Garlic can be stored in a cool, dark place for up to eight months if the temperature remains consistent and air circulation is good.
15. Eating
After growing and harvesting garlic, you can enjoy the fruits of your labor by adding it to your favorite dishes. Garlic is excellent for adding flavor to any dish, and its health benefits make it worthwhile growing in your garden.
Whether you’re growing garlic for fun or as a commercial crop, following these growing stages will help ensure healthier plants with greater yields.
Garlic Growing Stages Timeline

One of the most important things you’ll need to learn is the timeline of garlic growth. It will help you understand the changes that occur. Here’s what a garlic growing stages timeline looks like:
Stage 1: Planting – Germination (Fall/Winter)
This is the first stage of garlic growing and typically occurs in the fall or winter months. During this stage, you’ll need to prepare your soil by tilling it, adding any necessary amendments, and adjusting its pH levels for optimal growth. You’ll then plant cloves several inches apart and cover them with soil.
Stage 2: Growing (Spring/Summer)
In the spring and summer months, your garlic plants will begin to flower and form bulbs underground. During this stage, be sure to keep your plants well-watered, as too much or too little water can affect the growth of your garlic bulb. Also, weed your garlic beds regularly and fertilise the soil if needed.
Stage 3: Harvesting (July/August)
Typically, you can start harvesting garlic in late July or August, when the leaves on the plants begin to yellow and dry out. Loosen the soil around the bulbs with a garden fork and carefully dig them out. Make sure to take the time to brush off any excess soil and remove any green shoots that may have grown around the bulb.
Stage 4: Curing (Fall)
Curing garlic is a necessary step to preserve its flavour and shelf-life. Cut off any remaining leaves on your harvested garlic heads, then lay them in a single layer in a cool and dry area. Allow the garlic to cure for several weeks before storing it either by braiding or placing it into a sealed container.
Stage 5: Storing (Fall/Winter)
Once your garlic has been cured, you can store it for up to 8 months. Choose a cool, dry area for storage and provide good air circulation to prevent your garlic from spoiling. You can also freeze or pickle your garlic to extend its shelf-life even further.
You can enjoy homegrown garlic all year long with proper care and attention! Following these steps of the garlic growing stages will ensure that you get the highest-quality garlic possible.
Stage 6: Replanting (Winter)
At the end of the growing season, you can save some of your garlic for replanting the following year. Select a few healthy and large bulbs to use as seed stock, and discard any damaged or diseased bulbs. Plant the cloves several inches apart in early winter when temperatures are still cool and the soil is saturated with moisture. By replanting garlic, you can continue enjoying its outstanding flavour for years!
Grown with care, garlic will surely add a delightful flavour and aroma to your meals. Following these steps will put you on the right track toward having a successful homegrown garlic harvest for many years. Enjoy!
Garlic Vs Garlic Chives
Garlic and garlic chives are two different plants that belong to the same family but have distinct differences in appearance, flavour, and uses in cooking. Garlic chives have a milder flavour and are often used as a garnish, while garlic is a pungent spice that is commonly used in cooking.
Garlic is the most popular member of this family and it has a strong, pungent aroma that adds zest to dishes. The bulb is generally split into cloves, which are then planted and left to grow during the warm season. Garlic needs well-draining soil and plenty of nitrogen-rich fertiliser to thrive, as it’s a heavy feeder. It should be harvested when the leaves turn brown and the bulbs have a papery covering.
Garlic chives, on the other hand, are a milder type of Allium that has a sweet onion-like flavour. They have long grass-like leaves that can be used in salads or as garnish for dishes. Garlic chives require less fertiliser than garlic and prefer slightly drier soil. The bulbs should be planted early in spring and harvested when the flowers have wilted.
Garlic chives growing stages:
- Germination: Garlic chives are easy to grow in a variety of soils. They can be planted from seed or purchased as plants from a nursery. When planting garlic chives, it is important to keep the soil moist and give them adequate space to spread out and develop.
- Transplanting: Once the seedlings are large enough, they can be transplanted into the garden or into larger pots.
- Growing: Garlic chives prefer a well-draining soil in a sunny location. They should be watered regularly and fertilised with a balanced fertiliser every few weeks. Once established, garlic chives can grow quickly and will reach a mature height of 12-20”. They have hollow, green stems with white, star-shaped flowers that bloom in the summer.
- Flowering: Garlic chives will produce small white or pink flowers in the summer. These flowers are edible and have a mild garlic flavour.
- Harvesting: Garlic chives are ready to harvest when they reach their full height. To harvest, use scissors or garden shears to cut off the stems as close to the base of the plant as possible. The leaves and flowers can be used fresh or stored in the refrigerator for later use. Garlic chives can also be dried, frozen, or canned for long-term storage.
Generally, garlic and garlic chives are two different plants that belong to the same family but have distinct differences in appearance, flavour, and uses in cooking. Garlic chives have a milder flavour and are often used as a garnish, while garlic is a pungent spice that is commonly used in cooking.
Things to Avoid During Garlic Growing Stages

Each of the garlic growing stages need attention. Here are a few things to avoid.
- Do not plant garlic cloves too deep in the soil. Planting them too deep can lead to root rot and poor growth. Aim for shallow planting (1–2 cm) when planting garlic from cloves. It’s also important to avoid planting garlic in wet soil or areas prone to standing water. The garlic can rot if the soil remains too wet.
- When starting the first stages of growing garlic from cloves, it’s important to choose healthy cloves. Inspect each clove for any signs of disease and discard those that look unhealthy. Also, plant garlic in sites that receive at least six hours of sunlight each day. Too little sunlight can lead to garlic heads with poor flavour and texture.
- When garlic is young, avoid applying nitrogen-rich fertilisers. Nitrogen encourages leaf growth rather than encouraging the forming of garlic bulbs. Instead, apply phosphorus and potassium-rich fertiliser, which encourage garlic bulb formation. Also, avoid overwatering garlic stages, as this can lead to garlic bulbs that are split and cracked.
- Garlic should be harvested at the right time to ensure good flavour and texture. If garlic is harvested prematurely, it will not have had a chance to fully mature and develop a strong flavour. Once the bottom leaves of garlic plants become yellow, it’s time to harvest garlic. Dig garlic up and allow the heads of garlic to dry in a cool, dark area before storing them.
Do Garlic Plants Flower?

Yes, garlic plants do flower. The flowering stage of garlic growth is where your plant is bolting, which usually occurs in the later stages of the growth cycle. Bolting typically happens when a garlic plant has been growing for three or four months and has reached its maximum size.
When garlic bolts, it sends up a tall stem with a small flower head. The flower head contains tiny, purple-white flowers which contain the garlic plant’s pollen.
Bolting is an integral part of a garlic plant’s life cycle because it allows the plants to reproduce and spread their species. However, bolting can signify that it has passed its peak flavour if you are growing garlic for culinary purposes.
If you notice your garlic bolting, you can remove the flowering stem and any other affected plant parts to help preserve the bulb’s quality. Also, thin out your garlic patch to give each individual plant more room for growth. Doing so will also provide better air circulation and help prevent diseases.
Garlic plants do flower during the later stages of their growth cycle, but this doesn’t necessarily mean that the garlic is no longer edible. As long as you monitor your garlic patch and remove any affected parts, your garlic should be fine to eat.
Conclusion
Garlic is an easy crop to grow, and the rewards are many. With some knowledge and elbow grease, anyone can grow their own garlic successfully. There are 5 distinct garlic growing stages, each with its own set of tasks to ensure good growth and quality yields. Understanding these stages will make it much easier to produce a bumper crop of garlic in your own garden.
From preparing the soil and planting the cloves, to harvesting and storing, each stage plays an important role in the success of this beloved vegetable. With careful attention and proper management, anyone can produce delicious garlic. Happy Growing!
Frequently Asked Questions (FAQ)
What are the stages of garlic growth?
Garlic plants have four distinct stages of growth. These stages include germination, bulb formation, maturation, and harvest. During germination, a small shoot emerges from the seed and grows towards the surface. Once it reaches the topsoil, it begins to develop.
How long does it take for garlic to mature?
Depending on the variety of garlic, it typically takes anywhere from 6-10 months for a bulb to fully mature and be ready for harvest. However, certain climates or soil conditions can influence this timeline significantly.
Does garlic need sunlight?
Yes, garlic needs plenty of sunlight to thrive. For optimal growth, garlic should be planted in a sunny spot that receives at least 6-8 hours of direct sunlight per day.
How much water does garlic need?
Garlic should be watered regularly but not overly so, as it can cause too much foliage and reduce bulb size. The soil should be kept moist but not waterlogged. Generally, garlic needs about an inch of water per week during the growing season.
How often should I fertilise my garlic plants?
Garlic does best with regular fertilising throughout its growing period. Using a balanced fertiliser is ideal for about every three weeks during the summer months. This should be done up until the plants go dormant in the late summer or fall.
When is garlic ready to harvest?
Garlic is usually ready to harvest when its leaves start to turn from green to brown and become dry and crispy. You can gently pull one bulb out of the ground and check its size and feel. If it is firm and the wrapper is papery, it’s ready to be harvested.
How should garlic be stored?
Once you have harvested your garlic, store it in a cool, dark place with plenty of ventilation. Avoid storing in moisture-proof bags as this can lead to rot. Garlic can last several months when stored correctly.
Can I eat garlic that has not been harvested yet?
Yes, you can harvest and eat the young garlic cloves before they fully mature. These are known as green garlic or spring garlic and have a milder flavour than regular cloves. They can be eaten raw or cooked in any number of dishes.
Are there any pests or diseases that affect garlic?
Yes, garlic is prone to several common pests and diseases. These include rust fungus, root-knot nematodes, onion thrips, and purple blotch. Regular monitoring of your plants can help to prevent infestations or infections. If detected early, many can be treated with recommended fungicides and insecticides.
Can I grow garlic indoors?
Yes, you can grow garlic indoors in pots or containers filled with well-draining potting soil. However, the plants need access to plenty of sunlight and consistent watering. Depending on the variety and growing conditions, you may be able to harvest some bulbs indoors. However, yields will likely be lower than if they were grown outdoors in optimal conditions.
Are there any special tips for growing garlic?
Yes! When planting garlic, plant the cloves pointed side up at a depth of about two inches in the soil. Plant them four to six inches apart, and mulch around the plants with compost or straw to retain moisture. Additionally, avoid harvesting immature bulbs as this can reduce yields in future growing seasons.
Lastly, always practice crop rotation when growing garlic to prevent disease and pests from affecting your harvest.
How do I track garlic growing stages?
Take pictures of garlic growing stages and compare them with the stages of how garlic should grow. Track the progress and any changes in colour or plant shape throughout the growing cycle to help you detect problems early on. Also, keep a journal to track notes about your garlic plants, such as soil and weather conditions. This can also be helpful when predicting harvest dates.
Moreover, taking pics of growing garlic in stages will help you understand your plants more and create visual evidence of their growth over time.
This way, you can better predict the best harvest time for maximum yield and flavour of garlic bulbs.
It is also handy to track pests, diseases, or other environmental influences that might be affecting your garlic’s growth. Keeping an eye on all these details can help to ensure a successful harvest.
Tracking garlic growing stages may help you to maximise yields and improve your garlic harvest every year. With careful observation, you can become an expert at growing delicious garlic.

Pingback: What to Plant in November: Veggies, Fruits, Flowers and Grasses – Buyco – Buy Now our High Quality Products and Enjoy 3 Days of Free Shipping