
If you’re an experienced gardening enthusiast, you’ve probably marveled at the beauty of the string of hearts (Ceropegia woodii). Its delicate cascading vines adorned with heart-shaped leaves make it a favorite among plant lovers. But did you know that propagating this charming plant is not only an enjoyable endeavor but also a way to create new plants or enhance the lushness of the mother plant? In this guide, I’ll take you through various methods on how to propagate string of hearts – each with its unique charm and success rate.
So, let’s begin:
String of Hearts Overview

Before we dive deep into the propagation methods, let’s acquaint ourselves with the string of hearts plants. Ceropegia woodii, commonly known as string of hearts, is a lovely trailing succulent originating from South Africa. Its distinctive heart-shaped leaves and trailing vines make it an eye-catching addition to any plant collection. Beyond its aesthetic appeal, string of hearts is remarkably easy to propagate, making it an excellent choice for those new to plant propagation
Benefits of String of Hearts Propagation

Plant propagation is not just a horticultural practice; it’s an art that adds a plethora of advantages to your gardening journey. When it comes to the string of hearts (Ceropegia woodii), the benefits of propagating this charming succulent are abundant and delightful. In this section, we’ll elongate the discussion on these benefits, highlighting why propagating your string of hearts is an enriching experience.
1. Expanding Your Green Kingdom
One of the most rewarding aspects of propagating your string of hearts is the opportunity to expand your green kingdom. Each propagated plant becomes a new member of your plant family, contributing to the lush tapestry of your indoor garden. Whether you’re filling empty spaces in your home or adorning your workspace with greenery, propagating string of hearts allows you to create multiple plants from a single source, bringing more life and beauty into your surroundings.
2. Sharing the Green Love
Gardening is not just a solitary hobby; it’s a communal experience that brings people together. Propagating your string of hearts gives you the chance to share the green love with friends and family. Gifting a propagated plant is a heartwarming gesture that can bring joy to the recipient and spark conversations about plant care and propagation methods. It’s a delightful way to connect with fellow plant enthusiasts and nurture a shared passion for nature.
3. Enhancing Aesthetic Appeal
A fuller, more robust mother plant is a sight to behold. When you propagate your string of hearts strategically, you’re not only creating new plants but also enhancing the aesthetic appeal of the original plant. By encouraging new growth points and increasing the density of vines, your mother plant can become a showstopper in your indoor plants garden. The cascading foliage of a mature string of hearts is a natural work of art that can transform any space into a green oasis.
4. Creating Unique Arrangements
Propagating string of hearts opens the door to endless possibilities for creative plant arrangements. You can combine your propagated plants with other succulents, trailing vines, or colorful blooms to craft unique displays in pots, hanging baskets, or terrariums. Mixing and matching different plant varieties allows you to experiment with textures, colors, and shapes, resulting in stunning arrangements that reflect your personal style and taste.
5. Learning and Growth
Gardening is a continuous journey of learning and growth, and propagating plants like the string of hearts is an invaluable lesson in plant care and biology. Each propagation method you explore teaches you about the intricacies of rooting, growth hormones, and environmental factors that influence plant development. The more you propagate, the more you learn about your specific plant’s needs and preferences, making you a more knowledgeable and confident gardener.
6. Sustainability and Conservation
In an era when environmental sustainability is a pressing concern, propagating plants can be a small yet meaningful contribution to conservation efforts. By nurturing and propagating your string of hearts, you reduce the demand for commercially propagated plants, which often involves extensive resource consumption and environmental impact. Your propagation endeavors promote sustainable gardening practices and a deeper connection to the natural world.
7. Stress Relief and Wellbeing
Gardening, including plant propagation, has been recognized as a therapeutic activity that promotes stress relief and overall wellbeing. The process of caring for your string of hearts, watching it grow, and witnessing successful propagations can provide a sense of accomplishment and tranquility. The act of nurturing living beings, even in the form of plants, can have a positive impact on your mental and emotional health, reducing stress and fostering a sense of purpose.
Incorporating the string of hearts into your plant propagation journey not only brings these benefits into your life but also deepens your appreciation for the beauty and resilience of nature. Each propagated plant is a testament to the wonders of growth and the endless possibilities that lie within the world of plants.
How To Propagate String Of Hearts – Disclosing All the Methods
The journey of propagating string of hearts is a captivating exploration of nature’s resilience and adaptability. Each method brings forth a unique facet of the plant’s growth potential, allowing you to witness the marvels of life unfolding before your eyes. Let’s dive into the intricate details of each propagation method, unraveling the secrets behind their success.
Method#1 – How To Propagate String Of Hearts In Water

Water propagation is a captivating method that engages your senses and offers visual gratification as roots develop. By following these steps, you’ll master the art of water propagation:
1. Healthy Selection:
The foundation of successful propagation lies in selecting healthy vines with visible nodes. Nodes are those tiny, bulging points on the vine where leaves emerge. These nodes are the gateway to root development and the key to your plant’s future growth.
2. Trim and Prepare:
It involves delicately trimming the vines. Leave at least one node intact on each cutting, as it is this node that will be the epicenter of root growth. However, a crucial step lies in trimming away the leaves from the submerged end of the cutting. This seemingly small act prevents those submerged leaves from succumbing to rot and promotes a healthier, more resilient root system.
3. Room for Growth:
The next step involves creating a comfortable environment for your cuttings to embark on their rooting journey. You’ll need a clear container, preferably one that allows ample light to filter through. Fill this container with room-temperature water, inviting your cuttings to take their place within this aquatic sanctuary.
4. Observation and Care:
As your cuttings find solace in the water, it’s time to embark on a journey of patient observation. Position the container in a spot where bright, indirect light embraces your cuttings. Over the course of approximately one to two weeks, the magic of propagation unfolds before your eyes. The nodes you carefully preserved will begin to develop tiny, delicate roots, a testament to nature’s resilience and the plant’s innate ability to thrive.
5. Refresh and Change:
The process of propagation is a dance between nurturing and refreshing. As you nurture your cuttings, don’t forget to refresh their environment. Change the water every two weeks, or whenever you notice it becoming murky. This act of refreshment supports the health of the developing roots, ensuring they receive the oxygen and nutrients they need to flourish.
6. Transition to Soil:
As the roots reach a length of approximately half an inch (roughly 1 cm), your cuttings are ready to take their next step towards becoming thriving plants. The transition to soil marks a pivotal moment in their journey, and your role shifts from observer to nurturer. Choose a pot filled with moist planting soil, a welcoming home for your rooted cuttings. To ease their transition, consider placing the pot within a clear plastic bag or enclosure. This controlled environment mimics the humidity of their water propagation phase, aiding the transition from water to soil.
7. Keep an Eye on the Growth:
With your cuttings now nestled within the soil, the growth journey continues. Their newly developed root systems anchor them to their new home, ready to explore the depths of the soil and absorb the nourishment it holds. As days turn into weeks, you’ll notice new leaves emerging, evidence of your successful propagation venture. The cuttings that once danced in water now thrive in the earth, a testament to your dedication and the plant’s resilience.
Rooting cuttings in water is not merely a propagation method; it’s a narrative of growth, adaptation, and the intricate dance between the elements of nature. As you observe the transformation of cuttings into thriving plants, you’ll find yourself immersed in the wonders of life’s cyclical journey.
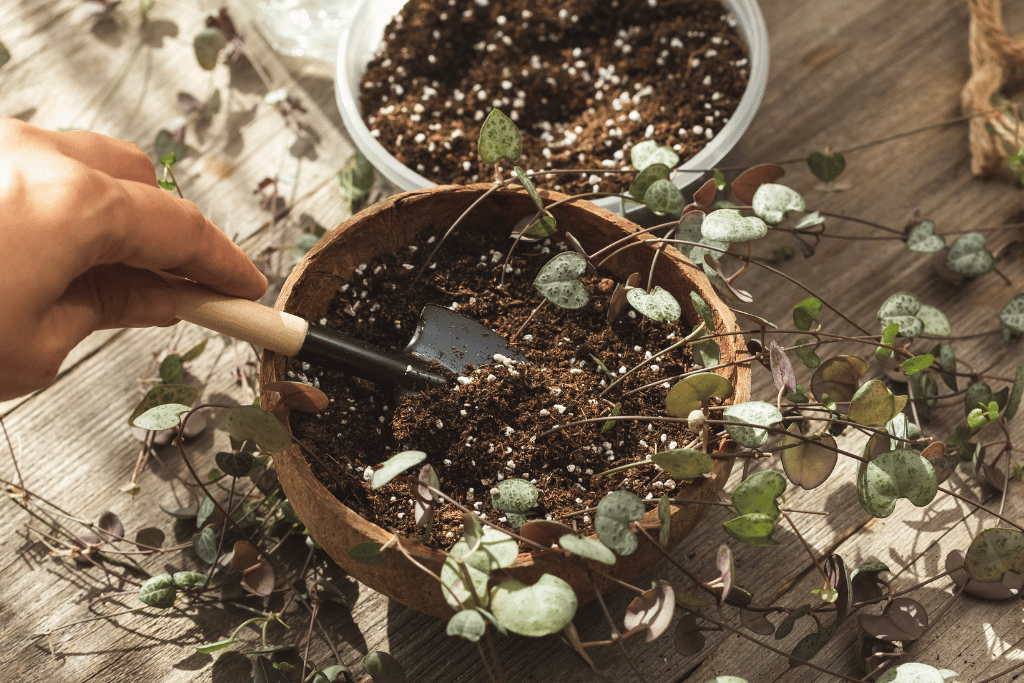
Method#2 – How to Propagate String of Hearts in Soil

Soil propagation, with its simplicity and effectiveness, offers a direct pathway for cuttings to establish themselves and grow into robust plants. Mastering this method involves understanding the nuances of soil, moisture, and the delicate balance that fosters successful propagation:
1. Healthy Clippings:
As you venture into soil propagation, your journey begins with the selection of healthy vines. These vines should boast nodes, those tiny bulges along the length of the vine that signify growth potential. The nodes are where roots will eventually emerge, anchoring the cutting within the soil.
2. Moistened Medium:
The medium you choose to propagate in is crucial to the success of the method. Opt for general potting soil or a succulent mix. The goal is to create a damp environment that encourages root growth. The soil should be moist to the touch without being overly saturated.
3. Planting Progress:
With your moistened soil prepared, it’s time to introduce your cuttings to their new home. Gently insert the cuttings into the soil, ensuring that the node is nestled within the medium. The node is the lifeline of the cutting, where roots will emerge and establish their connection with the soil.
4. Encourage Humidity:
A key aspect of successful soil propagation is maintaining the right level of humidity around the cuttings. This is where the use of a clear bag or enclosure comes into play. Placing the pot within the enclosure creates a microclimate that promotes humidity, essential for the development of strong roots.
5. Regular Monitoring:
As the cuttings embark on their rooting journey within the soil, regular monitoring becomes essential. A balanced level of moisture is crucial for successful propagation. Check the soil’s moisture level regularly, ensuring it remains consistently damp but not overly wet. This balance encourages root development while preventing rot.
6. Embrace Patience:
Patience is a virtue in the world of plant propagation. While some cuttings may root within a couple of weeks, others may take longer to establish themselves. It’s essential to maintain a nurturing environment during this waiting period, ensuring that the cuttings are receiving the care they need for successful rooting.
7. Witness Robust Growth:
As days turn into weeks, the cuttings will gradually establish their root systems within the soil. This is when you’ll notice signs of robust growth – the emergence of new leaves that signify the plant’s readiness to thrive. The journey from cutting to plant is a transformation that unfolds through your care and dedication.
As you provide the right conditions and care, the cutting responds by establishing its roots and forging a connection with the soil. This method exemplifies the simple yet profound ways in which plants and nature collaborate to create new life.
Method#3 – How to Propagate String of Hearts in Sphagnum Moss

Sphagnum moss propagation is a method that combines the best of water and soil propagation, creating an environment that fosters rapid and robust root development. As you explore this technique, you’ll discover the unique qualities of sphagnum moss and its role in nurturing the growth of your string of hearts:
1. Moistening the Moss:
The journey begins with the preparation of sphagnum moss, a versatile medium that retains moisture and supports root development. Begin by soaking the dried compact blocks of sphagnum moss in water. As water is absorbed, the moss transforms, expanding to create a lush and welcoming environment for your cuttings.
2. Cutting Selection:
Before embarking on this method, select the propagating material of your choice – whether it’s strands, cuttings, or a combination of both. The butterfly method, which involves leaving leaves intact on the node while trimming, is also an option. This method creates a nurturing space for roots to develop, and the presence of moisture within the moss encourages root growth.
3. Creating the Enclosure:
To ensure the success of sphagnum moss propagation, the creation of an appropriate enclosure is essential. Choose a container with a transparent lid or cover that allows light to filter through. This enclosure serves as a microclimate that mimics the conditions necessary for optimal root development.
4. Position and Light:
Place the container in a warm location where bright indirect light bathes the moss. Proper lighting is vital for encouraging strong growth and supporting the development of robust root systems.
5. Airflow and Checkups:
While the enclosure creates a nurturing environment, it’s important to provide moments of fresh air circulation. Periodically open the enclosure to allow fresh air to flow in, preventing the buildup of excess moisture. Additionally, these checkups provide the opportunity to monitor root progress and observe the growth of your cuttings.
6. Transplanting to Soil:
The ultimate goal of sphagnum moss propagation is to facilitate the transition of your cuttings from the moss environment to the soil. As the roots of your cuttings attain a length of approximately half an inch, it’s time to transplant them into soil.
This is a moment of transition, as your cuttings move from the moss’s nurturing embrace to establish themselves within the soil’s depths.
Sphagnum moss propagation represents a harmonious blend of elements – the water’s nurturing embrace and the earth’s stability. As your cuttings thrive within the moss, developing strong roots and displaying signs of growth, you’ll witness the culmination of nature’s collaborative effort.
Method#4 – How to Propagate String of Hearts Using the Tubers Method

Did you notice those little potato-like things on your string of hearts? No, they’re not pests – they’re actually something cool called aerial tubers! And guess what? You can use these little beads to make more plants!
Step 1: Spot the Big Tubers
Look closely at your string of hearts. See those round growths on the vines? Find the biggest one. It’s like picking the best piece of candy from a bowl. Choose one that’s about the size of your fingernail – that’s a good one!
Step 2: Decide How to Plant
Now, you’ve got a choice. You can leave the tuber right on the vine and press it gently into the soil. This way, it’s almost guaranteed to grow. It’ll root and start making more vines like magic.
But, if you want to take the tuber off the main vine, that’s cool too. Just make sure to leave a bit of those leafy parts on it. Then, pop the tuber into a pot filled with soil. It’s like giving it a cozy home.
Step 3: Keep It Misty
Tubers like a little mist. So, get your spray bottle ready and mist the soil lightly every day. Don’t flood it – just a gentle spritz to keep things damp.
Step 4: Wait and Watch
Be patient, my friend. After a few weeks, that tuber will start to grow roots. Remember, if it’s winter, it might take a bit longer. But if it’s sunny outside, things might happen faster.
Step 5: Be Patient (Again)
If the tuber has roots but seems slow to make new vines, don’t stress. It’s working underground to get strong before showing off its new vines. It’s like building muscles before a big show!
And that’s it! You’re on your way to having an even more lovely string of heart plant.
Method#5 – How to Propagate String of Hearts from Seed

So, you want to grow a beautiful string of hearts plant from seeds? Well, no worries – it’s easier than you might think! Here’s a step-by-step guide to help you along the way.
1. Get Your Gear Ready
First things first, grab a special tray for seedlings. It’s best if the tray has a cover on top, sort of like a tiny greenhouse, to keep things nice and moist. You’ll also need some special soil for succulents.
2. Fill ‘Em Up and Sow the Seeds
Fill the little containers in your tray with the succulent soil. Now, take your seeds – they’re super tiny, so be careful! You can use tweezers to put 1 or 2 seeds in each container. Place them gently on the soil. Cover them up just a little bit with more soil so they don’t fly away.
3. Give ‘Em Some Water Love
Time to give those seeds a drink! Use a spray bottle to make the soil wet. Be gentle so you don’t disturb the seeds too much. They need a bit of water to wake up.
4. Find the Perfect Spot
Put your tray in a cozy spot. It should be warm there, and not too bright. Think about a place that gets light, but not the harsh sun. That’s like a cozy home for your seeds.
5. Be Patient and Wait
Now comes the part where you need to be a little patient. Keep an eye on your seeds, but don’t disturb them. It might take a bit, but you’ll see the first tiny plants start to show up. These seeds are strong, so they won’t make you wait too long.
6. Let Them Breathe
When you spot those little plants popping up, you can take off the cover from the tray. They don’t need the cover anymore. Yay, they’re growing up!
7. Keep a Bit Moist
Until those tiny plants have a few leaves, give them a bit of water. Just a little though – don’t drown them! Once they’re a bit bigger, you can water them like you would a normal string of hearts plant.
And that’s it, you’re on your way to having your very own string of hearts plant that you grew from seeds! Just remember, be gentle, patient, and give them a little love along the way.
Method#6 – How to Propagate String of Hearts by Butterfly Method

Unlike the other ways we talked about, this one involves cutting your string of hearts into sections. Don’t worry, it’s like giving your plant a little haircut for a good cause.
Step 1: Making the Cuts
Imagine you’re cutting a sandwich into pieces. That’s what we’re doing with the string of hearts. But we’re keeping the hearts together, like a butterfly’s wings. Leave a bit of vine – about ¼ inch – on both sides of the hearts. This will be like the butterfly’s body.
Step 2: Create a Special Home
Now, it’s time to make a cozy home for your cuttings. Finding a clear plastic container – an old Tupperware or a takeout box works great. Put some wet sphagnum moss in the container. It’s like giving your cuttings a comfy bed.
Step 3: Place the Cuttings
Lay your butterfly cuttings on the moss. Remember, the hearts should be facing up, and the back of the leaves should touch the moss. Close the lid of the container. Now, find a sunny spot for it – not too bright, but nice and bright.
Step 4: Watch the Magic
Wait a couple of weeks and watch the roots start to grow. It’s like seeing little plant hairs pop out! New vines will also start to shoot from the cuttings. This method is awesome if you want lots of new plants.
Step 5: Settling In
Once the roots are good to go, you can plant the cuttings in your string of hearts soil mix. Don’t worry if a bit of moss sticks to the roots – it’s totally fine. It’ll actually help with draining water.
And there you have it – the butterfly method! You’ve just learned a new way to make more string of hearts plants.
Method#7 – How to Propagate String of Hearts By Looping Strands Back in Soil
This method is about looping the vines back into the soil to enhance the mother plant’s fullness. Here’s how to master this technique:
- Moistening the Soil: Ensure the mother plant’s soil is moist before beginning.
- Looping Vines: Gently loop a strand back into the soil without cutting it. Nodes should be in contact with the soil.
- Securing the Strand: Use clips to secure the strand in place, ensuring nodes are touching the soil. Mist the soil regularly to maintain moisture.
- Root Development: With time, roots will form, and new growth will emerge, contributing to a fuller mother plant.
Which Propagation Method is the Best? The Ideal Approach!
With the array of propagation methods at your disposal, it’s natural to ponder which one holds the title of being the best. Let’s delve into the options to help you make an informed choice, all while maintaining our simple tone and vocabulary.
Cuttings: Crafting a Vibrant New Plant
If your aim is to cultivate a healthy and thriving new String of Hearts plant, cuttings emerge as a preferred choice. This method offers the versatility to take cuttings almost anytime, even from trimmings during pruning. Each removed cutting has the potential to blossom into a brand-new plant, adding to the charm of your green endeavors.
Water vs. Soil: Two Routes to Root Success
Now, the decision-making path branches into whether to root your cuttings in water or soil. Each path has its unique merits, and we’ll explore them simply:
- Rooting in Water: Opting for water propagation lets you stay engaged in the mesmerizing journey of root development. Observing the growth of roots immersed in water can be a rewarding experience. This method provides visibility into the process, as roots start their delicate journey.
- Rooting in Soil: On the other hand, rooting cuttings directly in soil lays the foundation for robust initial roots that readily adapt to soil conditions. This method foregoes the transplanting step and ensures that your cuttings start off with a strong foothold in their future habitat.
Considering Your Preferences
Ultimately, the “best” method depends on your preferences and what aligns with your gardening style. If you revel in watching roots sprout and grow, the water propagation route might hold particular allure. On the contrary, if you seek efficiency and desire cuttings that are well-prepared for a life in soil, rooting directly in soil could be your chosen path.
FAQs on Propagating String of Hearts
When is the best time to propagate String of Hearts?
When propagating indoors, you can do it all year round, but the growing season is ideal, with spring being optimal.
Can you propagate String of Hearts from a single leaf?
Yes, it’s possible, but success rates are low. Try soil, water, or sphagnum moss. Keep the leaf dry to prevent rot. Use healthy, recently attached leaves. Root development may take a few weeks, but tuber formation and new growth might take months.
Will the plant continue to grow after cutting for propagation?
Absolutely, cutting can encourage growth, resulting in multiple new vines and a fuller mother plant.
Can you propagate a variegated String of Hearts?
Yes, the string of hearts variegated can be propagated. Use stem cuttings, tubers, or seeds. For stem cuttings, allow them to callus before planting. Press attached tubers into soil. Sow well-draining soil with seeds in fall or indoors if in a cooler area.
What’s the preferred propagation method for String of Hearts?
While single leaves can be used, stem cuttings and tubers are recommended for better success.
How long does single leaf propagation take?
Initial roots may appear in a couple of weeks, but it can take several months for a single leaf to develop into a new plant.
Can you propagate String of Hearts from seeds?
Yes, sow seeds in well-draining soil in fall or start indoors under a grow light in cooler regions.
How can you ensure successful String of Hearts propagation?
Use healthy material, maintain dryness to prevent rot, provide well-draining soil, and consider stem cuttings or tubers for more reliable results.

