Welcome to the world of Umbrella Plant propagation – a fascinating journey into the art of growing indoor greenery. The Umbrella Plant is known for its graceful leaves that look like the canopy of an umbrella. In this guide, you’ll learn how to grow Umbrella Plants from cuttings, watching new life unfold before your eyes.
This guide is for anyone who loves plants, whether you’re a pro or just starting. We’ll explore the step-by-step process of nurturing and growing Umbrella Plants from small cuttings. You’ll discover techniques to care for these plants and create your own indoor green haven. Get ready to learn and enjoy the rewarding experience of helping life thrive!
Reasons to Perform a Dwarf Umbrella Tree Propagation

I’ve always been intrigued by the idea of propagating my umbrella plant. There are several reasons why I decided to do it:
Expansion of Plant Collection: Who wouldn’t want more lush greenery around their living space? An Umbrella plant propagation allows you to create new plants from your existing ones, instantly expanding your indoor garden.
Sharing the Beauty: Friends and family often admire my umbrella plant’s vibrant foliage. By propagating my plant, I’m able to gift them new plants to enjoy and care for.
Learning and Experimentation: Propagation is a learning experience. It’s fascinating to observe how different methods yield results and to understand the science behind plant growth.
Cost-Effective: Buying new plants can be expensive. Propagation provides an economical way to multiply your plant collection without breaking the bank.
How To Propagate Umbrella Plant
Now, let’s explore the four methods I’ve used to propagate my umbrella plant: water propagation with stem cuttings, soil propagation with stem cuttings, sphagnum moss propagation, and air layering.
Method#1 – How To Propagate Umbrella Plant In Water – Water Propagation With Stem Cuttings
Water propagation is a simple and exciting way to multiply your umbrella plant. I remember the first time I tried this method; it felt like I was witnessing a secret world beneath the surface of the water. Let me walk you through the process with all its intricate details.
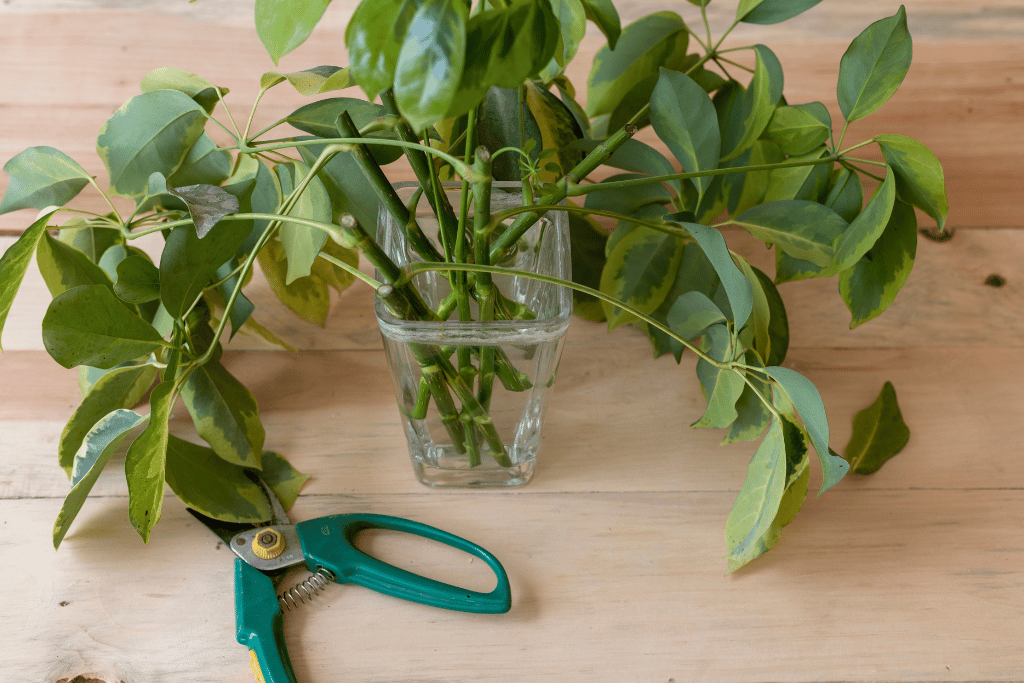
Step 1: Gather Cuttings
First, I carefully chose the branches of my umbrella plant that I wanted to propagate. These branches had vibrant leaves and were about 6-8 inches long. I made sure to use clean, sharp pruners to avoid any infections.
Step 2: Prepare Cuttings
Next, I cleaned my pruners with a special liquid called 91% isopropyl alcohol. This helped keep any harmful germs away. Then, using those clean pruners, I cut off the tips of the chosen branches. I made sure to leave about 2-3 inches of the stem without any leaves.
Step 3: Place in Water
With my cuttings ready, I placed them in a glass filled with water. It was like giving them a cozy temporary home. To help the cuttings grow roots, I put the glass in a warm and bright spot. I chose a location near a window that got some sunlight in the morning.
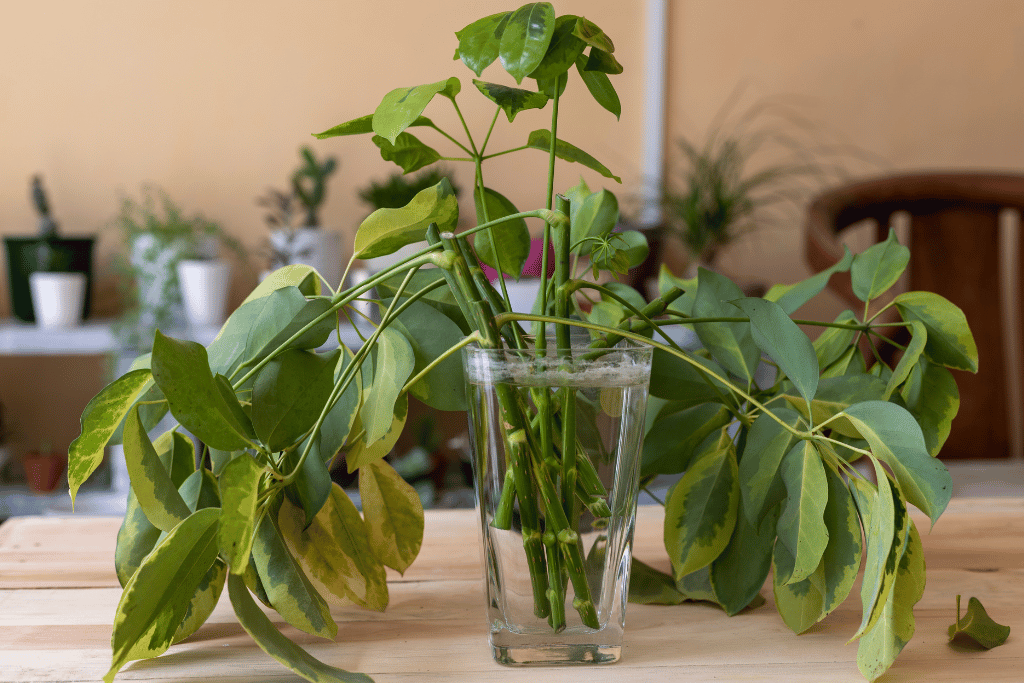
Step 4: Monitor and Change Water
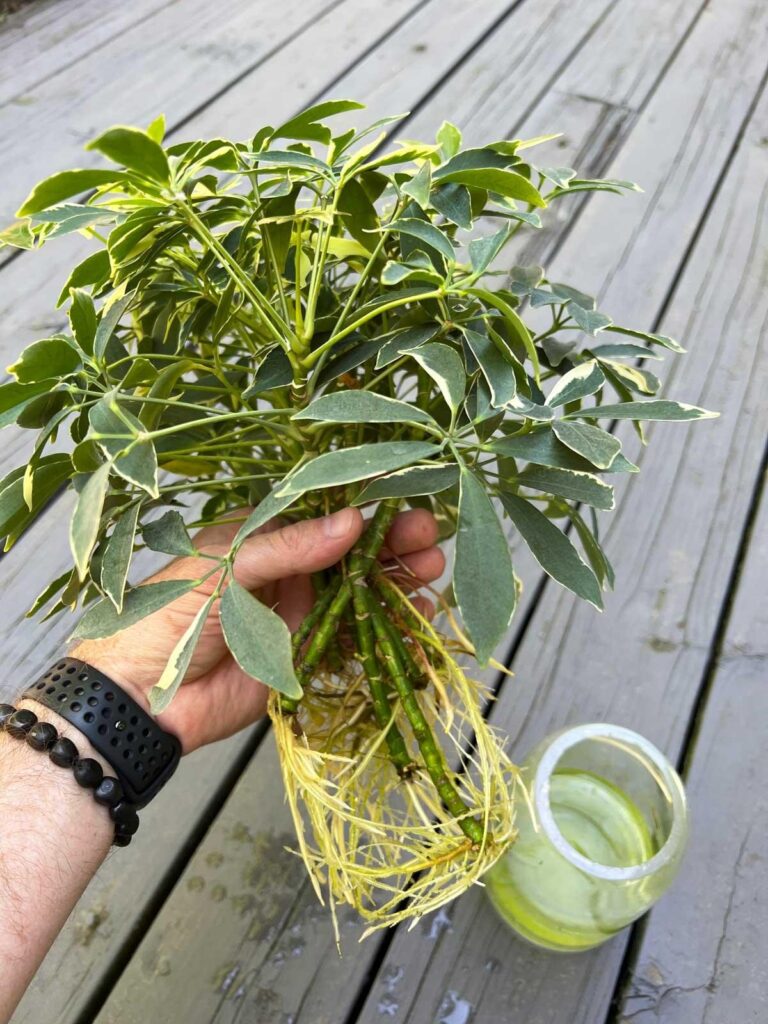
Watching the process unfold was both fascinating and relaxing. After a few weeks, I noticed something strange yet wonderful – white roots were growing from the bare stems into the water. It was as if the plant was saying, “I’m ready to explore the world!” I made sure to change the water in the glass every week.
This not only kept things clean but also made sure there was enough oxygen for the growing roots.
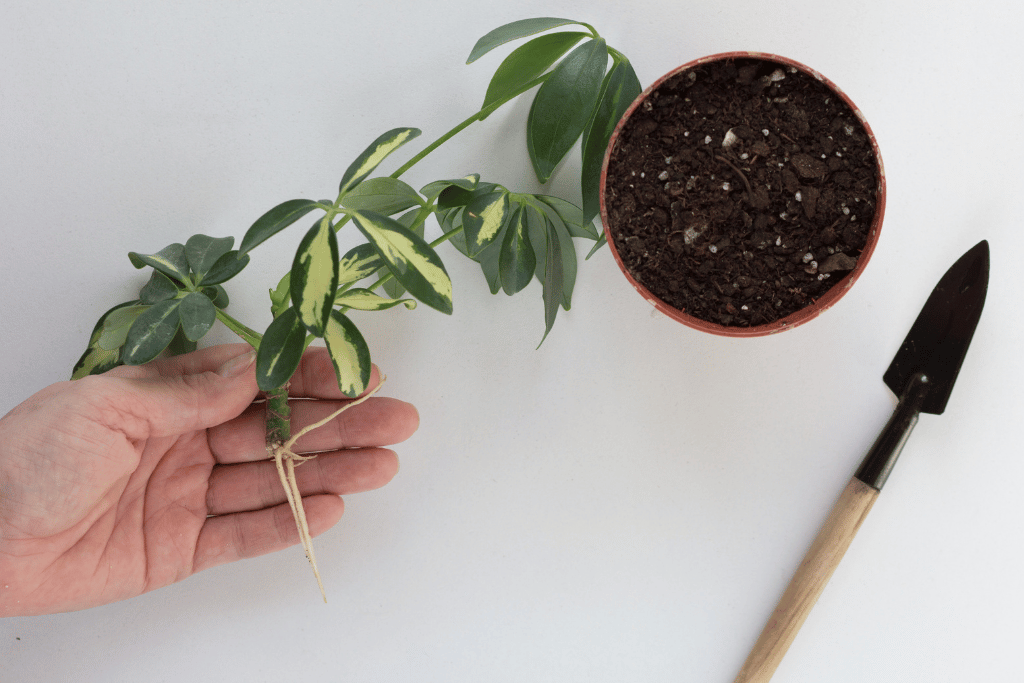
Step 5: Potting Up
As the roots grew to about 1-2 inches in length, I knew it was time to give these baby plants a more permanent home. I gently transferred them into pots filled with soil. To create the perfect soil mix, I used 3 parts of all-purpose potting mix and 1 part perlite. This mixture was like a cozy bed for my new plants.
But wait, there’s more! I learned that the size of the pot matters. If you have just one small cutting, start with a 4-inch pot. If you have a few cuttings, a 6-inch pot will do. These pots had drainage holes to make sure the water didn’t pool at the bottom and cause root problems.
My Observation of Propagating Umbrella Plant in Water
The joy of seeing those once-fragile cuttings transform into sturdy plants was truly rewarding. The roots grew, and new leaves started sprouting from the tops. It was a beautiful reminder of the magic of nature and how even a small cutting could turn into a thriving plant.
All in all, water propagation is a wonderful way to multiply your umbrella plant. It’s like giving your plant a fresh start in a new environment. The process is easy to understand and follow, making it perfect for both beginners and experienced gardeners. So, the next time you find yourself admiring your umbrella plant, why not try water propagation? It’s a journey full of surprises, growth, and a deeper connection to the world of plants.
Method#2 – How To Propagate Umbrella Plant From Cuttings – Soil Propagation With Stem Cuttings
When I delved into the world of plant propagation, soil propagation with stem cuttings quickly caught my attention. This method sounded like a direct way to help my umbrella plant thrive, and it indeed turned out to be a rewarding experience. Let me share with you the step-by-step process and the lessons I learned along the way.
Step 1: Prepare Cuttings
Just like with water propagation, I started by selecting healthy branches from my umbrella plant. These branches had the potential to grow into new plants. Using clean pruners, I snipped off the growing tips, ensuring that I had about 2-3 inches of bare stem.
Step 2: Insert into Soil
Now came the exciting part – getting the cuttings into the soil. Unlike water propagation, where cuttings grow roots in water before transferring them to soil, in soil propagation, the cuttings root directly in the soil. To give them a helping hand, I dipped the cut ends in something called rooting hormone. It’s like a special plant potion that encourages root growth.
Step 3: Maintain Humidity
To create the perfect environment for root growth, I used a neat trick: a heating mat. This mat provided gentle warmth to the soil, speeding up the root development process. It was like a cozy blanket for the roots. In addition, I placed bamboo sticks in the pots and covered them with clear plastic bags. This created a mini-greenhouse effect, keeping the cuttings warm and cozy.
Step 4: Observe Growth
As days turned into weeks, I was delighted to see new growth emerging from the cuttings. The small green leaves were a sign that the cuttings were on the path to becoming independent plants. I made sure to water the soil when the top inch felt dry, as a moist environment is crucial for encouraging root formation.
My Observation of Propagating Umbrella Plant From Cuttings
What I found particularly interesting about soil propagation was that it allowed me to have a better idea of the root development process. In water propagation, roots grow underwater, hidden from view. But with soil propagation, I could see the roots growing into the soil, anchoring the young plant.
Another bonus was that I could gently tug at the cuttings to check for any resistance, indicating the presence of new roots. This gave me a sense of connection with the plants and their growth journey. However, I learned to be patient and not disturb the cuttings too much, as they needed time to establish themselves.
After a few weeks, my propagated umbrella plants showed robust growth. New leaves appeared, adding to the charm of my indoor garden. It was amazing to see how these cuttings transformed into thriving plants, ready to face the world on their own.
Soil propagation with stem cuttings is a wonderful way to multiply your umbrella plant collection. It’s a direct approach that allows you to witness the growth process right in the soil. The use of rooting hormone and a heating mat adds extra support for successful root development. Whether you’re a beginner or an experienced gardener, soil propagation offers a deeper understanding of plant growth and a rewarding sense of accomplishment.
Method#3 – Sphagnum Moss Propagation: Nurturing Growth in a Cozy Nest
As my passion for plant propagation grew, I ventured into the world of sphagnum moss propagation. This method intrigued me because it offered a unique way for my umbrella plants to grow roots. Let me guide you through the steps of this fascinating process and share the wonders I discovered along the way.
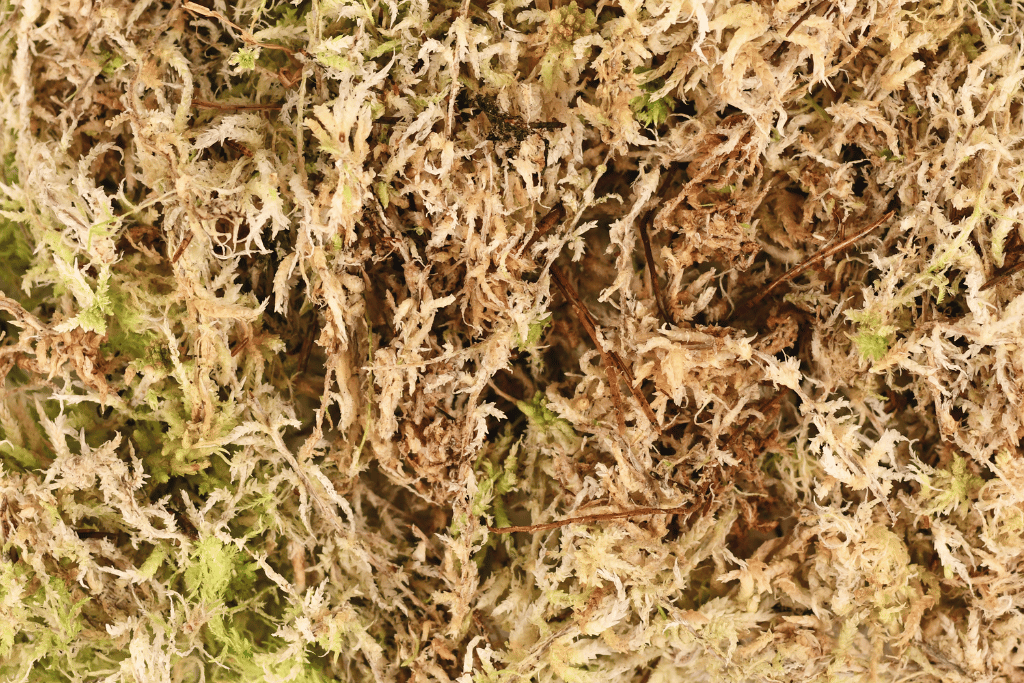
Step 1: Prepare Moss
Sphagnum moss is like a soft, fluffy material that plants find quite comfortable. To start, I soaked the moss in warm water for a few minutes. This made it moist and ready to cradle the cuttings. Then, I gently squeezed out the excess water, leaving the moss damp but not soggy.
Step 2: Enhance Humidity
Creating the right environment for the cuttings to thrive is key in sphagnum moss propagation. To do this, I used a special trick. I inserted bamboo sticks into the pots, creating a support structure, and covered the pots with clear plastic bags. This created a small, cozy greenhouse for the cuttings, keeping them warm and humid.
Step 3: Insert the Cuttings
Now came the exciting part – placing the cuttings into the moss. I nestled the cut ends of the branches into the moist sphagnum moss, ensuring that they were snug and secure. It was like tucking them into a soft bed for their growth journey.
Step 4: Monitor Progress
The magic of sphagnum moss is that it maintains moisture while allowing air to circulate. This is crucial for root growth, as it prevents the cuttings from rotting. Over the next few weeks, I kept an eye on the cuttings, eagerly anticipating the emergence of new roots.
Step 5: Transplanting Time
After a few weeks, I gently lifted the cuttings from the moss to check on their progress. To my delight, I saw roots starting to form. When the roots were about half an inch to an inch long, it was time to transplant them into pots filled with well-draining soil.
My Observation of Propagating Umbrella Plant Via Sphagnum Moss
What fascinated me about sphagnum moss propagation was its airy and open nature. Unlike traditional soil mixes, the moss retained moisture without causing root rot. This made it an excellent choice for propagating plants, especially those that needed a bit more moisture to grow strong roots.
Furthermore, the humidity tent I created using plastic bags and bamboo sticks proved invaluable. It acted as a nurturing cocoon for the cuttings, creating an environment where they could focus on rooting without feeling stressed.
As the weeks passed, I marveled at the success of my sphagnum moss-propagated plants. They showed healthy growth and strong roots, ready to explore the world. Witnessing the transformation from cuttings to thriving plants was a truly rewarding experience.
Sphagnum moss propagation offers a unique and effective way to multiply your umbrella plants. The soft, moisture-retaining nature of sphagnum moss provides a nurturing environment for root development. Creating a humidity tent adds an extra layer of care, ensuring that the cuttings receive the warmth and moisture they need.
Method#4 – How To Propagate Umbrella Plant Air Layering – Air Layering
Exploring various propagation methods led me to the fascinating technique of air layering. This unique method piqued my curiosity as it allowed me to propagate umbrella plants without detaching them from their parent plant. Let’s journey through the steps of air layering and uncover the secrets I discovered along the way.
Step 1: Prepare Stem
Air layering is particularly useful for plants with mature, woody stems. I selected a strong stem from my umbrella plant – one that showed promise for new growth. Before proceeding, I removed any leaves from the chosen section.
This bare area of stem, about 4-5 inches long, would be where the magic happened.
Step 2: Apply Rooting Hormone
To encourage root growth, I dipped a cotton swab in something called rooting hormone and applied it to the exposed part of the stem. This hormone acted like a cheerleader, motivating the plant to send out roots from this spot.
Step 3: Embrace the Moss
Now, it was time to introduce sphagnum moss, our trusty companion in propagation. I soaked the moss in warm water and gently squeezed out excess moisture. Then, I wrapped this moist moss around the exposed part of the stem, creating a soft and nurturing bed for future roots.
Step 4: Wrap in Plastic
To protect the moss and create a cozy environment for root development, I enveloped the moss-covered section with clear plastic wrap. This wrap was secured at both ends with twist ties or twine. It was like creating a special chamber where the plant could focus on growing roots.
Step 5: Patiently Await
Air layering is a slower propagation method compared to others, but it’s worth the wait. Over the course of a few months, I eagerly anticipated the moment when new roots would appear. The beauty of this method is that it requires minimal intervention – once set up, you can let nature work its magic.
Step 6: Success Unveiled
As time went by, I noticed a remarkable sight through the clear plastic wrap – the emergence of delicate white roots! These roots grew into the moist sphagnum moss, anchoring the plant and preparing it for a new chapter of growth.
My Observation of Propagating Umbrella Plant Via Air Layering Method
Air layering offers a unique advantage: it allows you to propagate plants without detaching them from the parent plant. This is particularly useful for plants with mature stems that might be challenging to propagate using traditional methods.
Additionally, the clear plastic wrap served as a window to the plant’s progress. Watching the roots form through the wrap was like witnessing a secret transformation unfold.
After patiently nurturing the air layering process, the time came to sever the newly rooted plant from its parent. With a sense of accomplishment, I carefully cut the stem below the formed roots. Then, I transplanted this new plant into a pot filled with well-draining soil, providing it with the ideal conditions to thrive.
I found the air layering a remarkable propagation method that offers a unique perspective on root growth. It allows you to create new plants while keeping them attached to the parent plant, ensuring a smooth transition into independent growth. Whether you’re experimenting with mature stems or seeking a less invasive propagation method, air layering opens the door to new possibilities in your indoor garden journey.
FAQS – Umbrella Plant Propagation
Can Umbrella Plants Thrive in Water?
Certainly. The dwarf Schefflera is capable of thriving in water, with the ability to withstand approximately six inches of water. This plant variety can also tolerate soggy soil when cultivated outdoors.
However, it’s worth noting that excessive moisture can hinder proper growth due to potential mineral deficiencies. It’s advisable to consider growing umbrella plants in well-draining soil to ensure their health and development.
How to Divide a Schefflera Plant?
To divide a Schefflera plant, start by using a sterilized pruner to carefully cut stems from a young umbrella plant. Employing a sterilized pruner is essential to prevent the spread of bacterial infections to the healthy Schefflera cuttings.
Can Schefflera Be Rooted in Water?
Absolutely. Schefflera, commonly known as the Umbrella plant, can indeed be rooted in water within a span of 4 to 5 weeks. Alternatively, you also have the option to root the plant in potting soil for quicker growth. If you choose the water rooting method, consider dipping the ends of the stems in a solution of rooting hormone to facilitate the process.
What is the Lifespan of Schefflera Plants?
Schefflera plants have the potential to live for up to 25 years provided they are provided with optimal conditions. Establishing appropriate watering routines and ensuring they receive bright, indirect sunlight are key factors that contribute to their robust growth and longevity.
How to propagate an umbrella plant from a leaf?
● Choose a healthy and mature leaf from the umbrella plant.
● Cut the leaf into sections, making sure each section has a portion of the main vein.
● Allow the cuttings to air dry for a few hours to prevent rotting.
● Dip the cut end of the cutting in a rooting hormone (optional) to encourage root development.
● Plant the cuttings in a well-draining potting mix, burying about an inch of the stem in the soil.
● Place the pot in a warm and humid location with indirect light.
● Keep the soil consistently moist but not soggy.
● After a few weeks, roots should start to develop, and new growth will appear.
Where to cut an umbrella plant for propagation?
To propagate an umbrella plant through stem cuttings, follow these steps:
● Choose a healthy stem with multiple leaves.
● Cut the stem just below a node (the point where a leaf is attached).
● Remove the lower leaves, leaving a few leaves at the top.
● Optional: You can dip the cut end in rooting hormone to encourage root growth.
● Plant the cutting in a well-draining potting mix, burying at least one node under the soil.
● Place the pot in a bright, indirect light location and maintain humidity around the cutting.
What are the umbrella tree light requirements?
Umbrella tree light requirements: Umbrella plants prefer bright, indirect light. They can tolerate some direct sunlight, especially in the morning or late afternoon, but too much direct sunlight can scorch their leaves. Place your umbrella plant in a location where it receives filtered light or bright, indirect light throughout the day. If you notice the leaves becoming pale or scorched, adjust the light exposure accordingly.
How to do an Umbrella tree indoor care
Indoor care for umbrella plants involves a few key factors:
● Light: As mentioned earlier, provide bright, indirect light. Avoid intense afternoon sun.
● Watering: Water your umbrella plant when the top inch of the soil feels dry. They prefer slightly moist soil but can’t tolerate being waterlogged.
● Humidity: These plants appreciate higher humidity levels. You can mist the leaves occasionally or place a tray of water near the plant to increase humidity.
● Temperature: Umbrella plants thrive in normal room temperatures between 65-75°F (18-24°C). Avoid exposing them to cold drafts.
● Soil: Use a well-draining potting mix to prevent waterlogging.
● Fertilizing: During the growing season (spring and summer), feed your plant with a balanced liquid fertilizer every 4-6 weeks. Reduce or stop fertilizing during the winter months.
● Pruning: Prune the plant to control its size and shape. You can also pinch back new growth to encourage bushiness.
● Pests and Diseases: Keep an eye out for pests like spider mites and mealybugs. Wipe down the leaves regularly and treat with insecticidal soap if needed.

